This is a joint project with my friend, James. We are building a riff on the famous Plate 11 workbench from Roubo’s “The Art of the Joinery,” along with coordinating mobile stands for James’s chop and bench saws.

Northern hard maple boards for the top.
Northern hard maple boards for the top.

Cutting top boards to length with a couple of inches extra.
Cutting top boards to length with a couple of inches extra.

Using the tracksaw to rip a straight edge of some of the lumber.
Using the tracksaw to rip a straight edge of some of the lumber.

Top boards cut to width and length plus a bit extra.
Top boards cut to width and length plus a bit extra.

A rough idea how the 4″ x 24″ x 72″ top will look once it’s all glued up.
A rough idea how the 4″ x 24″ x 72″ top will look once it’s all glued up.

Based on an average density of 44 lb/ft3 for hard maple, the top alone should weigh about 175 pounds.
Based on an average density of 44 lb/ft3 for hard maple, the top alone should weigh about 175 pounds.

Test clamp up of top without glue. Need more clamps.
Test clamp up of top without glue. Need more clamps.

Test clamp up of top – end view.
Test clamp up of top – end view.

Ah, nothing like a sunny winter day in the workshop, milling lumber for a project.
Ah, nothing like a sunny winter day in the workshop, milling lumber for a project.
 ready for glue ups.")
All the maple for the basic bench top and base, milled to rough dimensions and (almost) ready for glue ups.
All the maple for the basic bench top and base, milled to rough dimensions and (almost) ready for glue ups.

Rough parts cut for sizing and laminating. From left to right, four legs, two long rails, and five short rails.
Rough parts cut for sizing and laminating. From left to right, four legs, two long rails, and five short rails.

Short stretcher glue ups
Short stretcher glue ups

Long stretcher glue up
Long stretcher glue up

Ripping glue ups to final size
Ripping glue ups to final size

Heavy plastic protects bar clamps from glue squeeze out
Heavy plastic protects bar clamps from glue squeeze out

Just the right amount of glue squeeze out for good bonding
Just the right amount of glue squeeze out for good bonding

Cooking in the clamps
Cooking in the clamps

Jointing one face of laminated stretcher
Jointing one face of laminated stretcher

Major components set up in rough final configuration
Major components set up in rough final configuration

Major components set up in rough final configuration
Major components set up in rough final configuration

Nearly a gallon of Titebond III PVA glue was used
Nearly a gallon of Titebond III PVA glue was used

Applying glue to five boards at a time for glue up of the top slab
Applying glue to five boards at a time for glue up of the top slab

Working quickly, a grooved rubber roller spreads out glue in an even layer
Working quickly, a grooved rubber roller spreads out glue in an even layer

Seven sessions of five boards at a time resulted in a complete slab glue up
Seven sessions of five boards at a time resulted in a complete slab glue up

Top slab ready for flattening operations
Top slab ready for flattening operations

Laying out the custom router sled
Laying out the custom router sled

Positioning plywood rails for flattening
Positioning plywood rails for flattening

Fabricating the custom router sled
Fabricating the custom router sled

Fabricating the custom router sled
Fabricating the custom router sled

Complete router sled with handle in first trial position
Complete router sled with handle in first trial position

Using the “string method” to set plywood rails parallel to each other
Using the “string method” to set plywood rails parallel to each other

Small nails offset one string by its diameter
Small nails offset one string by its diameter

When the strings touch, the two rails are parallel
When the strings touch, the two rails are parallel

Underside of router sled showing relation of the bit to the slab
Underside of router sled showing relation of the bit to the slab

Four sets of passes on each side of the slab generated a lot of chips
Four sets of passes on each side of the slab generated a lot of chips

Light cuts were required with such a large bit in the hand held router
Light cuts were required with such a large bit in the hand held router

The whole process took several sessions over two shop days
The whole process took several sessions over two shop days

Some of the maple shavings will make great fire starters
Some of the maple shavings will make great fire starters

The finished slab with flat and parallel surfaces
The finished slab with flat and parallel surfaces

The Amana router bit left a pretty smooth surface
The Amana router bit left a pretty smooth surface

Retractable workbench casters are in
Retractable workbench casters are in

These casters will be ganged in pairs for parallel lifting of each end of the workbench
These casters will be ganged in pairs for parallel lifting of each end of the workbench

1 3/4″ straight cutting bottom clearing router bit
1 3/4″ straight cutting bottom clearing router bit

Top Slab ready for the next operation
Top Slab ready for the next operation

Several passes of the track saw from both sides squared off the slab ends
Several passes of the track saw from both sides squared off the slab ends

Trak saw’s 2″ depth of cut was barely able to get half way through the slab
Trak saw’s 2″ depth of cut was barely able to get half way through the slab

Leg blanks used to lay out mortises. Shoulder cuts for 2 1/2″ tenons
Leg blanks used to lay out mortises. Shoulder cuts for 2 1/2″ tenons

Using the bandsaw to make the cheek cuts for the leg tenons
Using the bandsaw to make the cheek cuts for the leg tenons

Completed leg tenons just needed a little cleanup with chisel and block plane
Completed leg tenons just needed a little cleanup with chisel and block plane

Building a router jig for leg mortises
Building a router jig for leg mortises

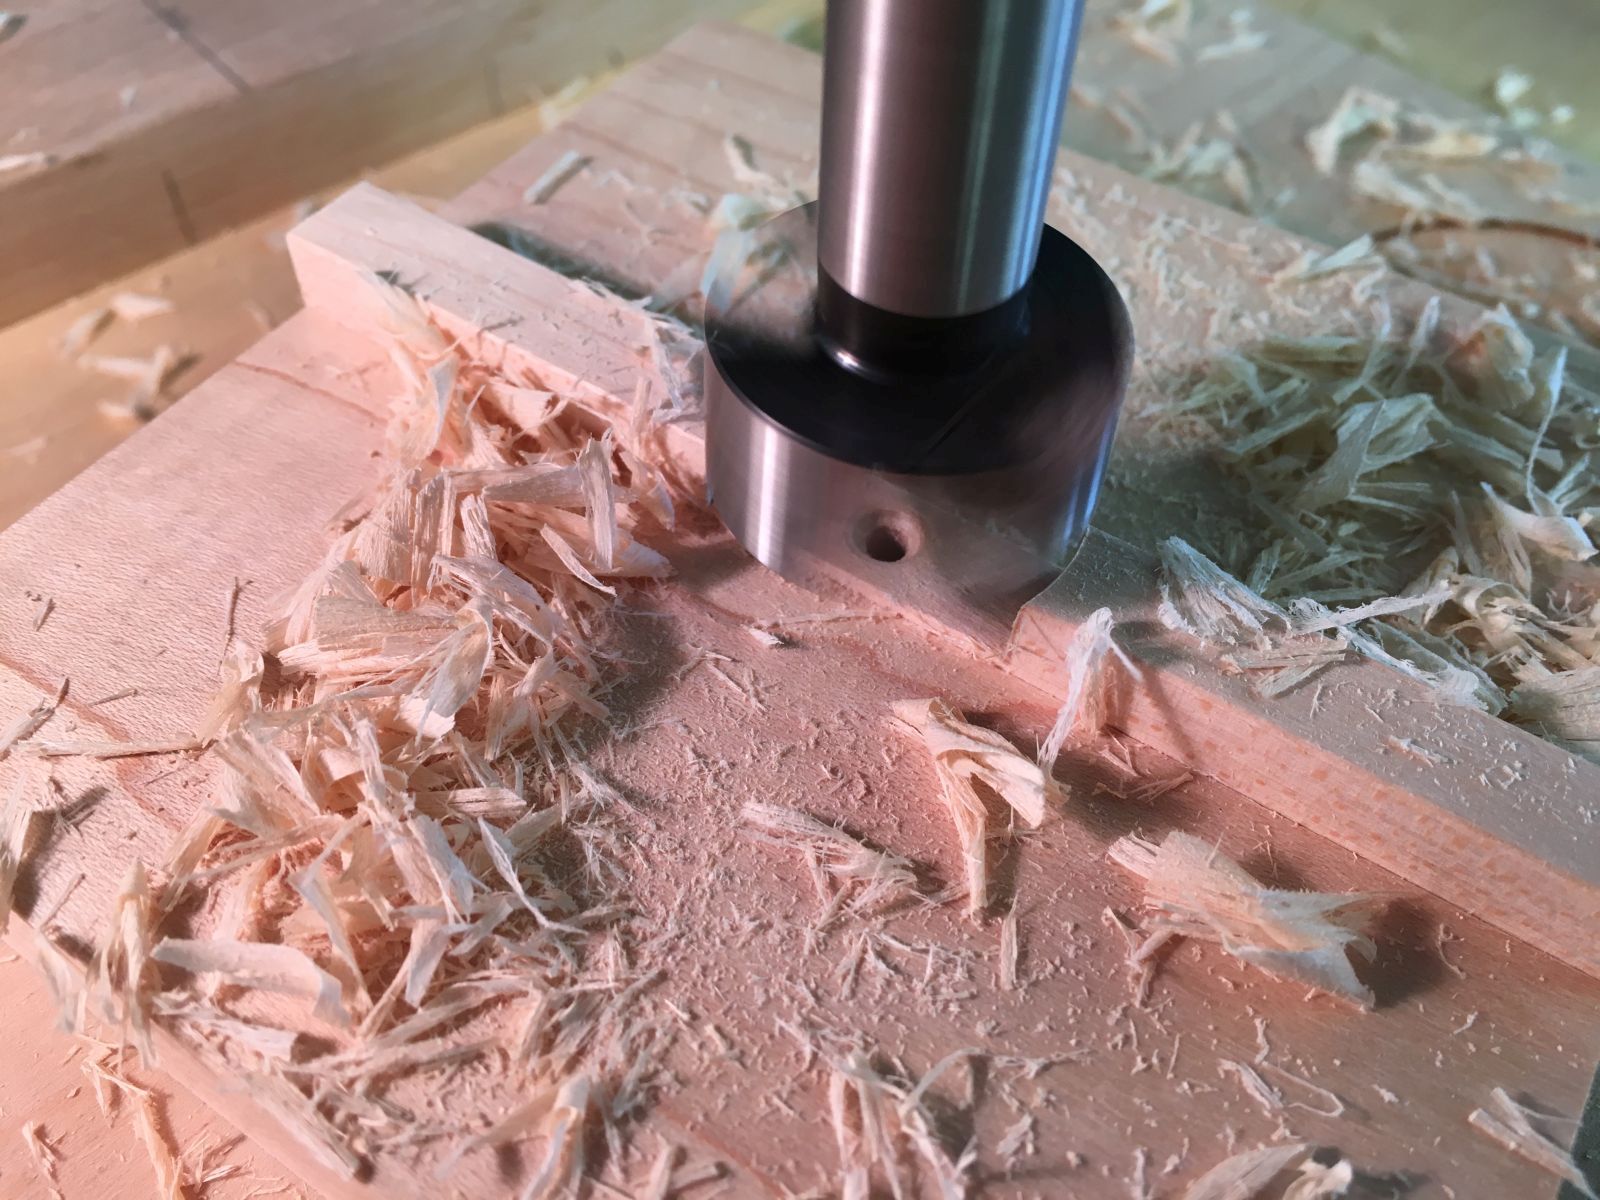
1 1/4″ Forstner bit was used to hog out initial material
1 1/4″ Forstner bit was used to hog out initial material

Mortise layout lines with centerline for drilling
Mortise layout lines with centerline for drilling

Drilling that first hole was a bit nerve racking
Drilling that first hole was a bit nerve racking

Combination square used to check depth of drilled holes
Combination square used to check depth of drilled holes

Four leg mortises with initial material removal
Four leg mortises with initial material removal

Router jig positioned and clamped
Router jig positioned and clamped

First level of material cleared with 1″ straight bit with top follower bearing
First level of material cleared with 1″ straight bit with top follower bearing

Even with light, the routing operations were done mostly by feel
Even with light, the routing operations were done mostly by feel

Two passes with the router left about 1 1/2″ of material to be removed with hammer and chisels
Two passes with the router left about 1 1/2″ of material to be removed with hammer and chisels

Old die makers trick, but using pencil lead instead of diemaker’s blue
Old die makers trick, but using pencil lead instead of diemaker’s blue

The pencil lead indicated tight spots for additional chisel work, speeding fitting process
The pencil lead indicated tight spots for additional chisel work, speeding fitting process

Tools of the trade
Tools of the trade

Four legs fitted and ready for trimming to length
Four legs fitted and ready for trimming to length

Easing corners with a block plane
Easing corners with a block plane

Cutting leg mortises with a dedicated mortiser
Cutting leg mortises with a dedicated mortiser

Who says you can’t drill square holes
Who says you can’t drill square holes

Short rail tenon cheek cuts on the bandsaw
Short rail tenon cheek cuts on the bandsaw

Marking mortise locations on the long rails
Marking mortise locations on the long rails

Rail assembly dry fit
Rail assembly dry fit

The York vise arrives from England
The York vise arrives from England

York HVR803 was well packaged
York HVR803 was well packaged

Woodworking vise with ten-and-a-half inch jaws
Woodworking vise with ten-and-a-half inch jaws

Drilling leg holes in legs on the drill press
Drilling leg holes in legs on the drill press

Custom jig for hand drilling peg holes in bench top
Custom jig for hand drilling peg holes in bench top

Jig clamped and ready for next hole
Jig clamped and ready for next hole

I didn’t think you could break a half inch drill bit with a hand drill
I didn’t think you could break a half inch drill bit with a hand drill

Modifying retractable caster bracket for 3/8 mounting bolt
Modifying retractable caster bracket for 3/8 mounting bolt

T-Tracks from Rockler for the top of the workbench
T-Tracks from Rockler for the top of the workbench

Rail assembly secured with four inch screws
Rail assembly secured with four inch screws

Cutting red oak dowling to length for pegs
Cutting red oak dowling to length for pegs

Chamfering and waxing pegs on the lathe
Chamfering and waxing pegs on the lathe

Chamfered, waxed pegs ready for assembly
Chamfered, waxed pegs ready for assembly

Pegging leg-and-stretcher subassemblies
Pegging leg-and-stretcher subassemblies

Leg and rail subassemblies ready to lift into place
Leg and rail subassemblies ready to lift into place

Leg and rail subassemblies glued and clamped, ready for pegs
Leg and rail subassemblies glued and clamped, ready for pegs

Transferring peg holes to leg tenons
Transferring peg holes to leg tenons

Square, sturdy base
Square, sturdy base

Legs pegged to bench top
Legs pegged to bench top

Long rails pegged to legs from the inside
Long rails pegged to legs from the inside

Trimming oak pegs with a flush cut saw
Trimming oak pegs with a flush cut saw

Pegs trimmed flush and ready for a little sanding
Pegs trimmed flush and ready for a little sanding

Excess peg lengths trimmed
Excess peg lengths trimmed

Fully assembled upside down workbench
Fully assembled upside down workbench

Marking lag screw holes for vise mounting
Marking lag screw holes for vise mounting

Holes located and ready to bore with custom perpendicularity jig
Holes located and ready to bore with custom perpendicularity jig

Four vise mounting holes bored for four inch lag screws
Four vise mounting holes bored for four inch lag screws

Mounted York vise showing fifteen inch opening capacity
Mounted York vise showing fifteen inch opening capacity

Assembled bench with vise and retractable caster brackets mounted
Assembled bench with vise and retractable caster brackets mounted

Cutting two 24 inch lengths of square steel tubing to connect retractable caster levers
Cutting two 24 inch lengths of square steel tubing to connect retractable caster levers

Drilling retractable caster levers for attaching steel tubing
Drilling retractable caster levers for attaching steel tubing

Steel tubing allows foot-activation of both casters
Steel tubing allows foot-activation of both casters

Upside down workbench ready for at least four guys to turn over!
Upside down workbench ready for at least four guys to turn over!

T-Track and hardware kits from Rockler … on sale!
T-Track and hardware kits from Rockler … on sale!

Four 48″ T-tracks and hardware
Four 48″ T-tracks and hardware

Ready to flip!
Ready to flip!

Flipped!
Flipped!

Router with edge guide and 3/4″ straight bit
Router with edge guide and 3/4″ straight bit

Routed grooves 3/8″+ deep for T-tracks
Routed grooves 3/8″+ deep for T-tracks

Blue anodized T-track close up
Blue anodized T-track close up

Cutting 12″ off each T-Track with a triple chip grind non-ferrous metal blade
Cutting 12″ off each T-Track with a triple chip grind non-ferrous metal blade

The triple chip blade cuts aluminum cleanly
The triple chip blade cuts aluminum cleanly

T-track installation with #6 screws every two inches
T-track installation with #6 screws every two inches

Maple jaws with oak dowel dogs added to the
Maple jaws with oak dowel dogs added to the

Oak dowel dogs line up with T-tracks
Oak dowel dogs line up with T-tracks

Vise has a steel dog on the bench centerline
Vise has a steel dog on the bench centerline

T-track stops being fabricated
T-track stops being fabricated

Pilot center hole in T-track stops
Pilot center hole in T-track stops

Drilling clearance for the T-bolt head
Drilling clearance for the T-bolt head

An assortment of T-track stops
An assortment of T-track stops

Getting ready to add the Marietta Wood Works brand
Getting ready to add the Marietta Wood Works brand

Marietta Wood Works burned in
Marietta Wood Works burned in

Closed 6×12 UHaul trailer for delivery rain or shine
Closed 6×12 UHaul trailer for delivery rain or shine

All four components loaded up and ready to be strapped down
All four components loaded up and ready to be strapped down

Workbench with cabinet
Workbench with cabinet

I am looking forward to seeing all the great projects James will do on his new workbench!
I am looking forward to seeing all the great projects James will do on his new workbench!

Rob and James with his new workbench
Rob and James with his new workbench

Chop saw and bench saw stands adjacent to the workbench
Chop saw and bench saw stands adjacent to the workbench

Decorative face frame on the back of the workbench cabinet
Decorative face frame on the back of the workbench cabinet